Sunday, September 30, 2007

Free Halloween Party Invitations

Well we are quickly coming up to that time of year again.

Halloween, Hallow's Eve, The Day of The Dead - whatever you wish to call it; it is on its way.

We just came home from a birthday party today where the Goody Bag (which was a trick or treat bag of course) included a Halloween Mask ("a cow" to be specific).

My daughter immediately put it on and walked around the house Mooo'ing to all of us. It was very cute.

But...it got me thinking about my son's upcoming birthday party (in late October).

It will be a Halloween Themed Party I am sure (he asks for that every year); where I suspect we will play more of our "proprietary" Halloween Games, we will have our own supply of Halloween Treats in the Goody Bags and we will use Halloween Cake Decorations.

But it all starts with the Halloween Invitations.

*I would love to take advantage of Michael's 40% off sale to get a Xyron Wishblade - or a CuttleBug Machine to make the cards...but I am not sure if I want to buy all of the associated Halloween Stencils or Dies - just for this (plus will I reuse the same ones again next year??? - probably not). Anyhow...

I may want to just want to keep it easy and stick with my traditional method of digitally designing the Halloween Party Invitations designs and then printing them.

I create them every year myself. And they get rave reviews. But they do take longer to make.

You can get them for free if you purchase this "Ultimate Halloween Party Games" eBook and it's accompanying bonuses.

But anyhow... I really can not decide this year.

These new desktop and digital die cut systems have great templates and they are so quick to turn out a project!

Both digital and hand made invitations give me a lot of joy and are quite fun to do...but what do you think? Can you help me out here?

Should I make Halloween Party Invitations with die cut systems or make another digital design this year?

Xyron Halloween Card Making

Got a great new project outline for making Halloween Cards today. Came in from Xyron. Uses Xyron Wishblade. *You can view the video for this hand made Halloween Card idea here.

Instruction:

STEP 1 Trim orange cardstock to two 8 ½ by 5 ½ inch pieces. Trim back cardstock to fit just inside back cover, to approximately 4 by 5 ¼ inches.


STEP 2 Using Xyron Wishblade, cut the word "Scary" into the orange cardstock.


STEP 3 Using Design Runner, the ruler from the Design Runner Accessory kit, and the Junkitz Patternz disk, print a row of bats in a straight line across the bottom of the front of the card under the word "scary."


STEP 4 Fold the card in half.


STEP 5 Tie ribbon around the front of the card, starting on the inside and ending with a knot over the word “scary.”


STEP 6 Using 3/8" adhesive runner, attach black cardstock behind the word "scary" on the inside of card. Be sure to only run adhesive around the edges or it will show through the word on the front. This piece of cardstock also helps hold the ribbon in place.


STEP 7 Use white pen to draw a scary face on the inside of one of the cut out letters.


STEP 8 Personalize the inside of the card with a greeting or invitation information.


Happy Card Making!

Thursday, September 27, 2007

Free Photoshop Brushes; Thank you At0mica

I have just found Atomica.net; one of the blogsphere's most popular contributers. The author, Heather (age 18), from Kansas - has done some amazing work - and will most likely continue to do so.

She offers free PhotoShop brushes for your downloading and PERSONAL use pleasure. While her primary focus does not seem to be Scrapbooking or Digital Scrapbooking - her stuff will apply.

You must read her terms and conditions before downloading, but you will love her work.

But please visit her site - support her growing career. She is an absolutely brilliant artist!

Wednesday, September 26, 2007

Scrapbooking Ideas - and How to OrganizeThem!

Okay...so I am sharing a TON of Scrapbooking Ideas with you here on this blog. And I am getting a lot of emails from people who have visited and have liked what I have shared.

So I think I have a duty to help you keep all of the ideas organized - if you decide to write them down or print them off for filing. So here are 5 amazing tips to keeping your Scrapbooking Ideas Organized:

  1. Plan a list of categories that your ideas can fall under (ie: album making, paper making, titling, journaling, photography, matting, cropping, accenting, embellishing etc.)
  2. Then create manila filing folders with one category word per folder.
  3. Start putting those same category words on the top of each page (that matches those words) you have listed your ideas on (it's okay if they fall under more than one category - but stick to the main ones). And start filing them under their respective folders. *For those you have multiple categories for, copy them - and file accordingly.
  4. Then get a copy of Paper Tiger through the Products page on Simply Productive - *I know it is somewhat expensive - but when you know all that it can do for you - it will be the best investment you could ever make. (Just imagine spending 5 seconds or less finding anything you need in the filing cabinet!)
  5. Then whenever you are need of an idea for any of those categories - all you need to do is search your keywords in this amazing software and Bob's your uncle!

    P.S. The Paper Tiger Software is great for organizing your bills, files and all other paper files! It is my personal saviour!

Happy Scrapping!

Tuesday, September 25, 2007

Halloween Scrapbook Page Ideas

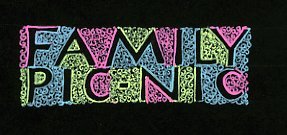
I found Pet Taylor online today! He (yes he) is a designer and Paper Craft professional of 20 years. He has a blog, that hasn't been updated for over a year now...but on his blog - he shared a great little tip for titling on black paper and I thought - well....since Halloween is just around the corner...why not share this with you and see if you will share your adaptation of MY IDEA (inspired by Pet) ...with me.

So...here's the summary...

On this page...Pet Taylor uses Black Paper and colored Gel Pens to create an eye catching title for a scrapbook page. He says:

"I ruled lines on black card using a pencil and drew some hollow letters. It was easy to make these lines of writing end up at the same place. I wrote the words out roughly on a scrap piece of paper first so I knew how much space they were likely to take up. As the lines were nearly the same length I knew they had to end up perfectly alligned, so on the second one I wrote 'pic' first, then matched up the 'c' of nic under the y and worked backwards, then finally added the hyphen. The coloring was done with gel-pens. I'm not sure how long the ink will last, but I'm sure it'll be for a long time. This design only works because there is very little black left in the spaces between letters. The texture is actually made up of little clockwise and anti-clockwise spirals, with the letter outline color matching the texture color."

Now...can you see how you might adopt this "idea" and create your own very cool Halloween Scrapbook Page Titles with black paper and orange or green gel pens? Or, what about using a silver pen changing the swirls Pet used - to spider webbing or bats? Or a red pen and drawing blood everywhere?

I bet it would be a blast! You could even get your kids involved with the designs around the letters. I can't wait to do this with my kids. I know they will love it!

*Oh and if you want your kids to host some Fun Halloween Parties or introduce some great Halloween Games to their friends this year AND if you want to scrapbook it all (including the great recipes you make for them) please visit our Halloween Games For Kids site - there are lots of great goodies to be found!

Happy Scrapping!


P.S. If you would like to learn more about creative ways to do your Wording, Journaling or Titling for your Scrapbook Pages, please sign up for our Scrapbooking Tutorials.

How to make an origami card holder

If you are a gift card fanatic; and you believe (as I do) in the value of gifting someone with one in effort to give them the chance to choose their own gift - then this video is for you.

In it, you will learn how to create an Origami Card Holder.

Its a great way to use some of that great Scrapbooking Paper that you just can not seem to incorporate into a layout. And it's also a great way to put some time, thought and even love into that gift because you do want to show the recipient how much you care about them!

Then if you use your imagination and a little more of your scrapbooking supplies, you can adhere (with a removable glue dot) that card holder to the inside of a well thought out - straight from the heart - hand made card and...

VOILA...you have 3 gifts in one
(the beautiful card, the card holder and of course the gift card).


What a great way to make something personal and unique out of something that can sometimes be perceived as "thoughtless" as a gift.

Happy Scrapping!

P.S. You can also use this card holder as an envelope for your childs school photos! And you can put 3 or more on your scrapbook page for decor! And if you are really gung ho about these, you might even find it fun to take those McDonalds Gift Certificates that you give away for Halloween, and turn them into wallets (or insert them into wallets).

See....wasn't your visit to this blog so much better than just watching the video by itself!

P.P.S. If you liked this, please leave your comments (by clicking the comments link below). It will inspire me to keep going with this blog.


How to Make Paper Flowers - Scrapbook LifeStyle

There is nothing better than finding a tool that can cut down on the time it takes to make Scrapbooking Masterpieces.

This video features a Sissix Big Shot Die Cutter. And shows how you can make paper flowers in literally seconds. It also shows you how to use different patterned papers and different sizes of your cuts to create layered flowers!


You can find the Big Shot new and slightly used through our eBay Scrapbooking Search Page. *Just type Big Shot Die Cutting into the search box on the top right hand corner here:

http://www.scrapbookingdirections.com/scrapbooking-supplies.html

And it will link you up with all current sellers of this amazing product!!!

Mad at Heidi Swapp or Stacy Julian?

Apparently there were a lot of dissatisfied customers recently who paid for a recent Big Picture Scrapbooking / A Year to Remember class online class offered by Stacy Julian.

The story unfolds itself here.

And according to this post: "It was like a snowball rolling downhill, gathering more and more momentum."

But what I want to know is what was the issue? Are people mad because they spent $300.00? Are they mad because the didn't like the contents of the kit? Are they mad about delivery? Or was it everything. And why?

Is it really possible that something offered by such a reputable company could have gone so horribly wrong that people can't stop talking about it?

I even understand that there are some complaints about how they handled the after effects??? Sounds like a huge mess. I do feel bad for everyone involved. But would love to know what really happened.

Can you please shed some light here?

I did not partake in that class nor am I a registered member of Big Picture Scrapbooking.

But I certainly do not want to be in Stacy Julian's nor Heidi Swapp's place right now. Nor do I ever want to repeat the mistakes they did to make so many of their loyal customers angry.

Were you one of the "very unhappys"? Or do you know someone who was? Please leave your comments if you were.


Wednesday, September 19, 2007

Romantic Scrapbooking Part 2; How to Write a Love Poem

How to Write a Love Poem

For the cash-strapped, or romantically inclined, writing a sincere, well thought out love poem for your Scrapbook may be just the ticket to your loved one's heart.

It is easy to express your true feelings and thoughts in free-verse or rhyme. You don't need to be a Shelley or Browning to write a great poem. All it takes is sincerity, effort, a loving feeling...and something to write with.

  1. Write a page of standard prose, as fast as you can, about how you felt the first time you saw your loved one, how you felt the first time you knew you were in love, and how you feel right now about being together. These three moments in time will create the structure of your poem.
  2. Replace any weak verbs with stronger verbs and any pronouns with proper nouns. Words depicting the 5 senses work well for love poems.
  3. Reread your passage and pick a metaphor to tie the three moments together. Choosing a metaphor is the most fun part so be wild with it. An opening flower is a tried and true metaphor for love, but a cloud that looks like a heart might work even better.
  4. Rewrite your passage using the metaphor to describe the three moments.
  5. Read your page aloud, change things that sounds "off" to you. Make notes where you feel there's a pause in the flow.
  6. Write the poem, putting a line breaks where you made the notes.
  7. Paste it into your Scrapbook as the cover page - or next to the photo that most inspired the poem!
*And if you ever get married, renew your vows or just have one of those unique opportunities together where a speech to one another is required, use the poem as your read - this will definitely pull on the heart strings.

Happy Scrapping!

Scrapbooking Favorites! Only one day left to vote!

Quick update.

On the right hand side of this blog - there is a Poll going on. In it you are asked:

What's your favorite scrapbooking method?


There is now only one day left to vote on this. Please cast now. It may determine the next few posts here on the blog.

Sincerely, Cijaye.

Monday, September 17, 2007

World Card Making Day

What will you be doing on World Card Making day? Click the link to visit the official site. I think this is pretty cool.


World Card Making Day: "Holiday Details Card Making

WHAT World Card Making Day is a holiday especially for card makers around the world to:

# Celebrate the creativity of handmade cards and the personal connection that they create between friends and family

# Kick off (and get a head start on) the holiday card-making season WHEN The first Saturday of each October, kicking off the holiday card-making season, the most popular time for creating and sharing handmade greetings.

WHO The card-making community worldwide, including hobbyists, beginning card makers, manufacturers of card-making products, retail sellers of products, educators, and press are invited to come together to celebrate this holiday and creative passion.

WHY It is a day to connect with fellow card makers both near and far, to applaud the creativity that powers the craft, and to provide an opportunity for card makers to connect and find resources that will empower, inspire, and encourage them in their card making."


P.S. If you do make any cards for world card making day - because you heard of it first through this blog - please let me know; share your card images with me. I really want to see them!

Scrapbooking Retreat / Fundraiser! Brilliant!

I stumbled upon this Fundraising Scrapbooking Retreat article today and had to share it. I love the idea.

I am now wondering if there is a way I can create something similar for my local community. And if not the community, at least the school. I know that the schools are always looking for creative ways to fund raise.

Hmmm...food for thought. Anyhow, here is the article.

Williamsport Sun-Gazette: "Scrapbook fundraiser set in area LIVONIA — Local scrapbooking enthusiasts will come together for the first-ever Scrap Pink weekend, a fundraising event created by Scrapbooks etc. to benefit the breast cancer foundation, Susan G. Komen for the Cure.

Hosting the event locally will be www.scrapabunch .com, a Union County-based online scrapbook company. During Scrap Pink weekend, retailers will invite consumers to participate in a crop.

Consumers will pay to attend the crop, and $10 of this fee will be donated to support Komen’s mission to find a cure for breast cancer through research, education, screening and treatment.

The event will be a weekend retreat at the Timberwinds Lodge and begins at 5:30 p.m. Sept. 28 and lasts until 2 p.m. Sept. 30. The retreat is all-inclusive and will include a goodie bag, door prizes, contests, games and more. Registration is required and may be made by calling 444-4004 or at
www.scrapabunch.com."

Great Tips for Forgotten Scrapbook Journaling.

Planning your journaling text into your layout is the wisest way to go. However, there are many times where we just can not seem to find the right way to fit it in - or we do the page and forget about the journaling all together.

In this case...we are left to our SuperPowered Creative Vices to get it in somewhere.

So here are some great tips for adding journaling later:

  1. Write / wrap your words around the edge of each photo, mat or main focal point. *Be sure to plan it out in pencil first - you don't want to run out of space or bunch anything up.
  2. Print your journaling text onto vellum (works great on dark colored backgrounds) and lay it over something other than the main photo.
  3. Or add Pockets or Envelopes (you can get transparent ones) and place the velum into it. This can go on the page or on the page protector.
  4. Write or print onto transparency and insert that into a pocket on top of your page protector or as a complete overlay over a page element or the entire page (under the page protector).
  5. Creating a ribbon style add on (where the hight is no higher than 1 - 1.5 centimeters - and the length spans the page) - made entirely of paper (with some sort of matting behind it) with your words spanning across. *Yes this leaves room for no more than 2 lines of text and can be quite limited but with most pages an extra ribbon works just fine - therefore your ribbon journaling will too. *You could even do this with a label maker.
  6. Bind a Fold Over onto the page. (Ie: From the left or the right, overlap and adhere an appropriate width of paper to your page. Then journal and scrap that to match the original page. Now it is a fold over - but does not take away from your page. PLUS you can use the bottom for more journaling, more photo's or even a title that you may have forgotten.
  7. Create a half circle (or oval) or any other appropriate shape - that comes to only 1/2 - 1 " high - and mount it over a less important space on your main photo. Then journal that. *HINT: If your photo is black and white or very bright - use a dark color with white pen - the effect is much better.

Now...if you are doing a digital layout...
  1. Why not revise the background slightly and place your journaling onto it (as part of the background). Remembering that white on dark is best.
  2. Why not place the words into one of your already existing page elements (ie: Do you have a large flower on the page? Could the words going into the petals? What about a photo frame or border - can you place your words in there?)
  3. What about adding small blocks of journal text throughout the blank spaces on the page? Lay them out in rectangles, left to right and top to bottom of the page (making sure that each block can stand alone as text). If someone looks at the page long enough they will be able to piece that all together.
And have fun with it all.

The great thing about Scrapbooking is that no-one will ever know that you left something out or added something in. They will only ever see the final piece. And will be thrilled anyhow!

Happy Scrapping!

Friday, September 14, 2007

Intro to Scrapbooking - Grand Opening Special!

Grand Opening Special Offer!


In celebration of opening this blog, I am offering a HUGE discount on my very first eBook!


Yes - I have written a few other eBooks on Scrapbooking since this one - but it is the Introduction to Scrapbooking (for beginner scrapbookers). No Scrapbooking Magazine, Book or Website on the planet has explained it better!

*I know - because my buyers have told me!

The regular retail value is : $17.99 - however to celebrate the opening of this blog, I have devised a special Promotion: $5.99 (For Beginners Only).

" With this book you will "Learn how and why we Scrap Book - and ideas on what we can do with our projects - beyond Scrapbooking!"

Yes, that's also true. Your Scrapbooking skills do not have to end at Scrapbooking Albums, Layouts or Pages. You can do so much more with your Scrapbooking Supplies! You can make handmade cards, party invitations, framed wall images, coasters, journals and so much more! Learn all that you can now - with this unbeatable offer!


Special
Promotion: $5.99 (For Beginners Only)

Promotion Has Ended. Thank you to all of you who purchased!

Thursday, September 13, 2007

Some more Digital Scrapbook Layouts

What I especially like about these ones is that I asked both my son and my daughter to help me out by creating the images that inspired the pages.

For the "Basketball Diaries" page, my son drew the basketball that I have incorporated into the background paper and the main image center.

I scanned his drawing and turned it into a photoshop brush! That's it that's all.

Of course...I did go to town a bit on the "filters" side of things by texturizing the basketball with sandpaper pattern, and drop shadowing it. Oh and I used a brad I created for another set. And of course, I pasted my images "into" the open spaces of the main basketball.

Then, for the "You are My Sunshine" page - my daughter (5 years old) drew the sun that you see in the center. I turned that into a brush also.

I then created the doodle art flower background out of a flower embellishment I had made previously. AND, I created my own stitching brush (that you can see around the blue denim overlay across the top).

I am loving this. Its so rewarding and hightens our bonds greatly!


I highly recommend that you do this too if you enjoy working with Photo Editing Programs and creating your own digital scrapbooking elements.


Creating my own Digital Scrapbooking Elements.

Well, this month marks a very exciting shift for me in the Scrapbooking Arena.

I was getting ready to write my latest Scrapbooking Newsletter about "What is Digital Scrapbooking" when I got completely sidetracked.

I started thinking of some unique things I could SHARE in that email - and all of a sudden found myself playing around with Photo Shop.


Now, normally playing in PhotoShop is somewhat quick and easy for me. I have been using it for years for basic graphic arts - but this time, I started getting really creative with making my own background papers, titles and page elements.

Inspired by Manilla Folders - the Tabbed Matting behind the photo's came to life. Then it felt empty - so the pinkish brad came to life.


All of a sudden I created an entire library of new layouts - with my new background pages, my new title and many new page elements. Needless to say...some really cool stuff came of it.

And I had a LOT of fun.

I was once very dismayed by Digital Scrapbooking because I didn't have the freedom I was used to with the Digital Scrapbooking Software(s) I tried. Now...I am ALL OVER IT!


So...in short...I am on a mission to expand my horizons and I can't wait to share the new stuff I come up with!!!

*Please tell me what you think.

Regards, Cijaye.

Romantic Scrapbooking Ideas for Relationships

Romantic Scrapbooking Ideas for Relationships
by Cijaye DePradine


Nothing is quite as impressive or a more fitting compliment to a partner than a Romantic Scrapbook that is created just for them.

A scrapbook that has pictures, memories and keepsakes of the time you have spent with your partner (whether it be a boy friend, a girl friend, your wife or your husband) is an amazing gift.

Your Romantic Scrapbook is a way of saying 'I love you', and can help you express your love for someone - when photo's or words are not enough.

No matter what the occasion, it is probably the most personalized present that one person can give to another. And no one could ever duplicate it!

How much more unique can it get?

The first step in making a Relationship Scrapbook for your partner is planning what you want it to be about.

Write a bullet point list and brainstorm some ideas.

Then, choose the right scrapbook album. You know, the one that most closely represents the warmth and love you feel in your heart.

There are so many different types of albums available and depending on what you plan to put in the scrapbook, there is one that will be just right for you. You can learn more about these unique albums through the Beginners Tutorial at ScrapbookingDirections.com.

Now its time to put your scrapbook together, there are no restrictions on what you can put in the scrapbook. In fact that only limitation you may have is your own imagination.

The good news is, there are free scrapbooking ideas and even samples all over the internet. You will get inspired everywhere.

The only cautionary statement I might make is that if you have plans to put this Romantic Scrapbook together in the very near future - don't spend too long searching for ideas. It is way to easy to let hours and even days slip away when admiring all of the great works out there.

Get what you can and get out.

Then take a run for it! There is no easier way to start a scrapbook than to "just do it"! (Like Nike says).

If you want a few outstanding ideas for scrapbooking your relationship - view the complete article at http://www.scrapbookingdirections.com/romantic%20scrapbooking.htm


To purchase exclusive books on How to Scrapbook please visit http://www.scrapbookingdirections.com/scrapbooking-products.html"